Thursday, March 29, 2012

WHOO Influences You?

I am on this whole owl theme and here is another idea to go with our health unit.  We created owls out of construction paper and glued a picture of someone or something that influences us in the middle.

Our next lesson in health was on how we make decisions. We talked about how there are direct and indirect influences. The students had some great questions, comments, and thoughts on the subject!

Here are the steps to making this SO cute little owl.  I found a basic owl pattern online and made copies of it on white paper.


The students had to cut out the patterns and then they traced them onto the colored construction paper of their choice.  They then cut those out.
Once everything was cut out, they assembled it and glued the pieces in place.  The last step for this project was for them to glue a picture of something or someone that influenced them onto it.


 Once everybody was done, we went around the room and shared what the picture was of and how that person or thing influences them. Here are some of my favorites :) They include a professional athlete, dad, and Selena Gomez!


And of course they then had to be added to the back wall! I love how everything is coming together!

Warm and Fuzzy

While I know that it it so much work be to be out of school for even one day, I couldn't help but smile when I walked into my classroom to this on Monday morning. 

I have such wonderful, kind, and thoughtful students! I truly blessed to have such a wonderful class.

Monday, March 26, 2012

Gold Rush Pillow

We talk a lot about how tough life was in a mining camp and in early California in general. This activity gives students a small taste of what that life was like.


Miners in California had a rough life and very few comforts. Most were men who were away from their wives and families. When they had a hole in their pants or jackets, the men had to mend it. When they had a hole in their tent or blanket, they didn't buy a new one, they mended the one they had.  So clearly, I had to teach my fourth graders how to sew!

Each student had to bring a 12"by 12" piece of fabric with a western or California theme to it. Here are some of my favorites.

Each student also needed to bring in a needle and a spool of thread. Some of them got really excited and brought in their own little sewing kits!


So the students started by flipping the fabric inside out. I told them they want the "ugly sides" out. They then had to the thread the needle! What a challenge this was! I told them they had to try and do it three times before they could raise their hands and ask me to do it.
Once the needle was threaded they would sew the pillow in one side and back down that same side, keeping the stitches very small. They will need to sew along 3 and half sides. This was really hard for them to do so I usually had a couple of "room moms" come in to help (This AND the knots, the re-threading of needles, and the finger pricks!). 

Once they had sewn three and half sides they flipped the fabric inside out, so now the pretty side was showing. At this point, they filled their pillow with stuffing. They need to fill it so it had enough "cush", but not so much that they couldn't sew it shut.


 The last step was to sew their pillow shut. For this step they had to sew "down and around," as opposed to in one side and back down that same side (it makes it easier to keep the stuffing inside).


Tweet Something Positive!

So we did the second half of our self-esteem lesson today and it was so much fun! We reviewed how self-esteem is developed and then spent some time talking about how powerful our words are in developing self-esteem.  Since our next section is on decision making I took this time to "front load" them with some thoughts on how using positive words and making good decisions go hand in hand. And of course what better way to teach this than through Twitter!

 
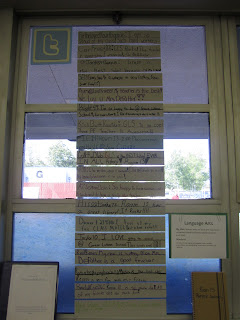
I  made this Twitter logo using some scrapbook paper I had at home.
 I gave each student a piece of gray construction paper and I explained how you create a name for yourself, mine of course was Fortheloveoffourthgrade.

After that I modeled how we can use social media to build people up, encourage them, and praise the good things they have done. We can use things such as Facebook and Twitter in positive ways that help young students such as themselves develop positive self-esteem. My tweet said " I am so proud of my fourth graders! They are such hard workers!"

Here were some of my favorite tweets from the students


  I took all of them and created a Twitter feed on our back window of positive thoughts about our school, our friends, and Room 13

Tuesday, March 20, 2012

WHOOO Am I?

We are starting our Life Skills or health unit in fourth grade. I have been in love with all these cute owls I have seen everywhere and have found a way to incorporate it into my classroom. YEA!!!

So our first section is on self-esteem. We discuss how it can be positive and negative. We also talk about about self-esteem is built. We play a game called"Three of a Kind".  Students are put into groups of three, shocker, and are asked to fin three things that are different from from their partners and then three things that they have in common with their partners.  Its really hard for them to find things that our different but much easier to find things in common.

I use this as a time to talk about how we, as humans, tend to always point out what make others different from us. But that is really is a silly thing to do since we have so much in common! We also talk about how God built use to be special and unique and that it is okay to be different. 

 After our game and talk, the students had to write a paragraph about "Whoo am ?"  They could include any details they wanted. I always encourage them to use their best spelling and grammar.


I then mounted them on colored construction paper.


Last, they went up on our back window as the first part of Room 13's owl themed health unit!

Monday, March 19, 2012

Gold Rush Frame

This is one of my culminating activities for our gold rush unit. After we learned about the three routes to California, the tools miners used, and what life was like in the mining camps we created a gold rush picture and frame.
The students started by creating a frame out of popsicle sticks and small pebbles. Next, each student got a piece of 6" by 6" white construction paper to a draw picture that represented the gold rush in some way. The only rule they had was that they had to put California 1849 somewhere on their picture.  Some students drew mining camps and others drew the tools miners used and gold nuggets.  They all came out really cute!


The students set their frames on the back counter to dry and when the students went home I took out the can of gold spray and went to town!  I have sprayed them out on the lawn in years past, but this year I got smart and just covered a table! Didn't hurt my back and didnt have to move 22 frames once they dried!

The final step was to have students glue their picture to the gold frames! Viola! A beautiful craft that reminds them of all they learned about the gold rush!